Having been inspired by all of the Chevron Scarves all over Ravelry, I decided to make my own Chevron Lace scarf. I loved the idea behind the original design in Last Minute Knitted Gifts, but I wanted something a little different - same concept just not the same :)
So I searched the wonderful world of the internet and found a stitch library at Knitting on the Net. I also searched my books but I had this particular pattern stuck in my head – probably from a sweater hanging in the store – and I was desperate to find it.
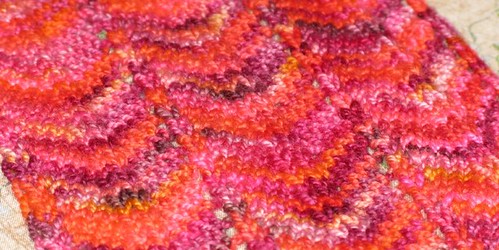
My other reason for wanting to make this scarf was the fact that I had four balls of this crazy hot Koigu (now 3 after making the scarf) and wanted to make something fun but mindless. The pattern of inspiration used 2 contrasting Koigus. I could just not find another yarn either in my stash or in the stores that contrasted in just the right way. Basically, I was being ueber-picky. So I went with the cool version of the same colour and am thrilled with the result! Granted, it looks like I only used one colour but it is now a more toned down version of the original purchase. And it reminds me of one of my favourite drinks – the Tequila Sunrise (yes, the drink is usually more yellow or orange bu i happen to like more grenadine in the mix than most)
There was a bit of trial and error with the pattern – such as just plain casting on too many stitches and making the scarf ridiculously wide.
Without further ado - the pattern for my:
Tequila Sunrise Special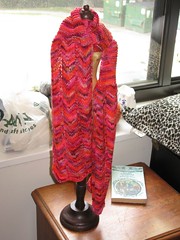
Materials:
1 skein hot pink/orange Koigu (A)
1 skein cool pink/burgundy Koigu (B)
needle size -3.75 mm/US 5
Stitch holder
Note: Scarf is worked in 2 separate pieces to allow for scalloped edges then sewn together with Kitchener stitch
Finished Measurements: total length - 60"/width of chevron section - approx 5"/width of garter - 3.5"/length of garter section - approx 28"
With Colour A, cast on 36 stitches (pattern repeat is Multiple of 13 + 1 +2 for selvedge stitches)
Row 1: Knit to the last stitch, bring yarn forward, and slip last stitch as if to purl
Row 2: Knit into the back of the first stitch, continue knitting to the last stitch, bring yarn forward, and slip last stitch as if to purl.
Row 3: repeat Row 2
You should have 2 Garter Ridges or 4 Knit Rows (cast on row counts as 1st Knit Row)
Begin pattern stitch:
Row 1 (RS): Knit into the back of the first stitch *k1, yo, k4, k2tog, Sl1, k1, psso, k4, yo; rep from *, to last 2 stitches, k1, bring yarn forward, slip last stitch as if to purl.
Row 2: Knit into the back of the first stitch, purl to last stitch, bring yarn forward, and slip last stitch as if to purl.
Rep Rows 1 and 2.
Change to Colour B, repeat rows 1 and 2, 2 times.
Change to Colour A, repeat rows 1 and 2, 2 times.
And keep on keeping on until you have reached approximately 13 inches from the cast on row AND have finished a 4 row repeat.
Decrease Rows:
With RS facing, Change colours and Knit 2 rows (one garter ridge).
Dec Row: (With same colour) Selvedge, *k1, k4, k2tog, Sl1, k1, psso, k4; rep from *, k1, selvedge. (36 stitches) - ###this is not a typo, this is the same as the pattern stitch Row 1 but without the YO’S###
Next Row: Knit
Change colours:
Dec row: selvedge, *k1, k3, k2tog, Sl1, k1, psso, k3; rep from *, k1, selvedge (30 stitches)
Next Row: Knit
Change colours:
Dec row: selvedge, *k1, k2, k2tog, Sl1, k1, psso, k2; rep from *, k1, selvedge (24 stitches)
Next Row: Knit
Change colours:
Dec row: selvedge, *k1, k2, k2tog, k2; rep from *, k1, selvedge (21 stitches)
Next Row: Knit
******Change colours:
Knit 2 Rows *******
Break Yarn leaving approximately 12 inches and place stitches on a stitch holder
And begin again - this time starting with Colour B.
Follow pattern, working your way through the decreases. Repeat from ****** to ******* working just in Garter, changing colour every 2 rows until you have almost run out of Yarn or until you have reached your desired length.
Sew the 2 halves together using your favourite directions for the Kitchener Stitch – don’t forget to have wrong sides together and the yarn needs to come form the back needle.
You could three-needle bind off with right sides together, but I think Kitchener is so much prettier.
Block – the edges will have a natural wave.
The end!
----The usual copyright rules apply to this pattern - personal use only - blah - blah - blah.
I have only written 2 other patterns before and those were crochet – so let me know how this goes if you make it.

2 comments:
ooooh... mjammm!
this looks fabulous!
think this will go on my list - this would make a great present for my sister! :)
(ah, and I LOVE those colors you chose!)
aaaaarrrghhh.... I was about to start a chevron scarf as your PIF... aaaarrrrghh.... need new idea...
Post a Comment